How to Make a Copy of a Picture in Lightroom on Computer
Duplicating a photo in Adobe Lightroom Classic can be achieved through several methods.
For most users, creating virtual copies is the preferred method for duplicating photos in Lightroom Classic. It allows for multiple edits and comparisons without the overhead of additional files.
👍Also Read:
The 9 Best AI Photo Editors to Touch Up Your Photos
The 17 Best Free Photo Editing Software for Windows and Mac
Creating Virtual Copies
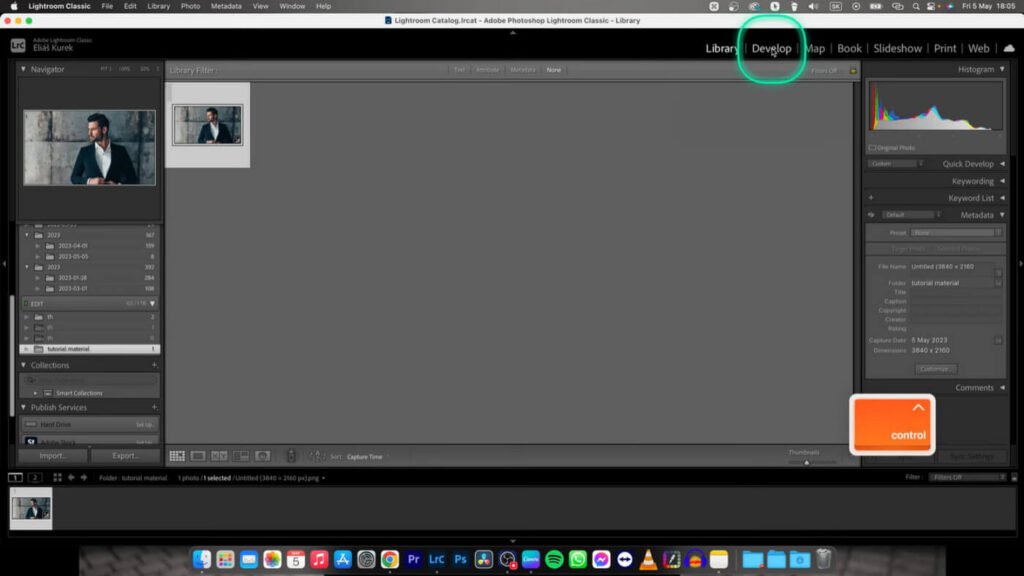
1. Using the Develop Module:
2. Open Lightroom and go to the Develop module.

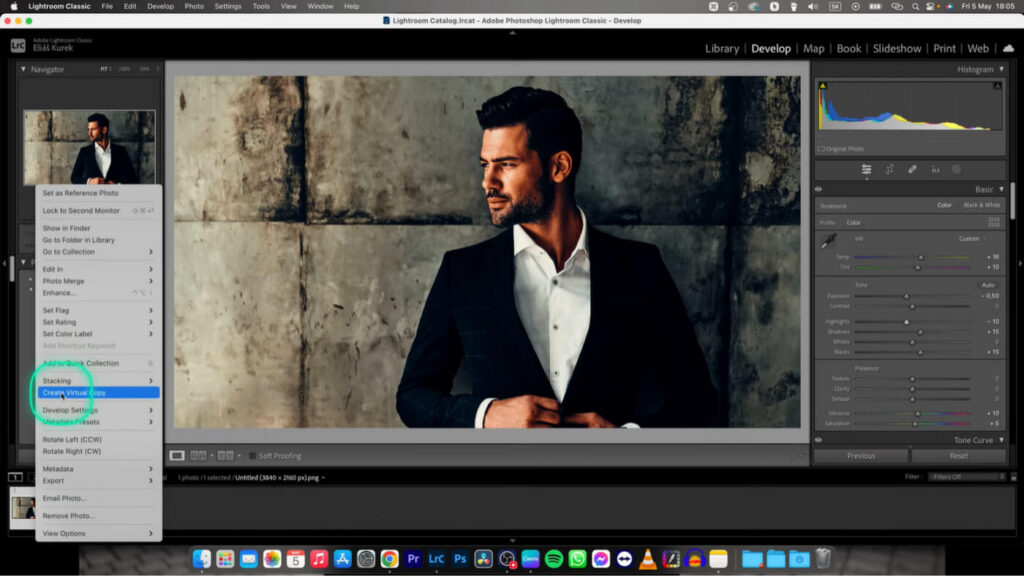
3. Select the image you want to duplicate from the filmstrip at the bottom.
4. Right-click on the image and choose “Create Virtual Copy” from the context menu.

A virtual copy of the image will appear next to the original in the filmstrip, indicated by a ‘page-turn’ symbol on the bottom left corner of the thumbnail.
Virtual copies are advantageous because they do not consume additional disk space. They simply create a new set of editing instructions for the original image, allowing you to maintain multiple edited versions of the same photo without duplicating the actual file.
Duplicating Original Files
Although less recommended due to space efficiency, you can also duplicate the original files:
Outside of Lightroom:
1. Locate the image file in your computer’s file explorer.
2. Right-click and select ‘Duplicate’ to create a copy of the file.
3. Import the duplicated file back into Lightroom if necessary.
On Export:
In Lightroom, select the image you want to duplicate.
Go to File > Export, and in the export settings, choose ‘Original’ under File Settings to export the original image.
This method actually duplicates the file, creating a new file on your disk.
Managing and Deleting Virtual Copies
To manage or delete virtual copies:
1. Switch to Grid View by pressing ‘G’.
2. Use filters to find the image by its name.
3. Select the virtual copy and press ‘X’ to reject it, then delete it by pressing CMD/CTRL + Backspace.
How to Make a Copy of a Picture in Lightroom on Mobile
While the Lightroom Mobile does not directly offer a simple “duplicate” function like its desktop counterpart, it’s still viable to duplicate a photo in Adobe Lightroom Mobile.
You can use several methods depending on your specific needs and the version of Lightroom Mobile you are using.
Export and Re-import Method
This method involves exporting the photo and then re-importing it into Lightroom Mobile to create a duplicate:
1. Open the photo you want to duplicate in Lightroom Mobile.
Tap the Share icon (on Android, it resembles three connected dots; on iPhone, it looks like a box with an arrow pointing up).
2. Choose Save to Device on Android or Export to Files on iPhone and iPad.
3. Save the exported photo to a desired folder on your device.
4. Go back to Lightroom Mobile and import the photo you just saved.
Using Versions
Lightroom Mobile offers a feature called “Versions,” which allows you to create different edit versions of the same photo:
Open the photo in Lightroom Mobile.
Tap the Clock symbol at the top middle of the screen to access Versions.
Tap on Create Version to make a new version of the photo, which you can edit independently from the original.
Workaround Using External Tools
If you need a physical duplicate of the photo (not just a different version), you might need to use external tools to change the photo’s metadata so that Lightroom Mobile does not recognize it as a duplicate:
Export the original photo.
Use an EXIF editor to change the photo’s metadata.
Re-import the modified photo back into Lightroom Mobile.
Remote Access to Desktop Lightroom
If the mobile app’s functionality is limited, you can remotely access a desktop version of Lightroom using apps like Screens. This allows you to use the desktop’s features, including duplicating photos, which can then be synced back to your mobile device.


![Read more about the article How to Install Stable Diffusion Using Easy Diffusion [Step by Step]](https://motricialy.com/wp-content/uploads/2023/07/easy-diffusion-768x402.jpg)
