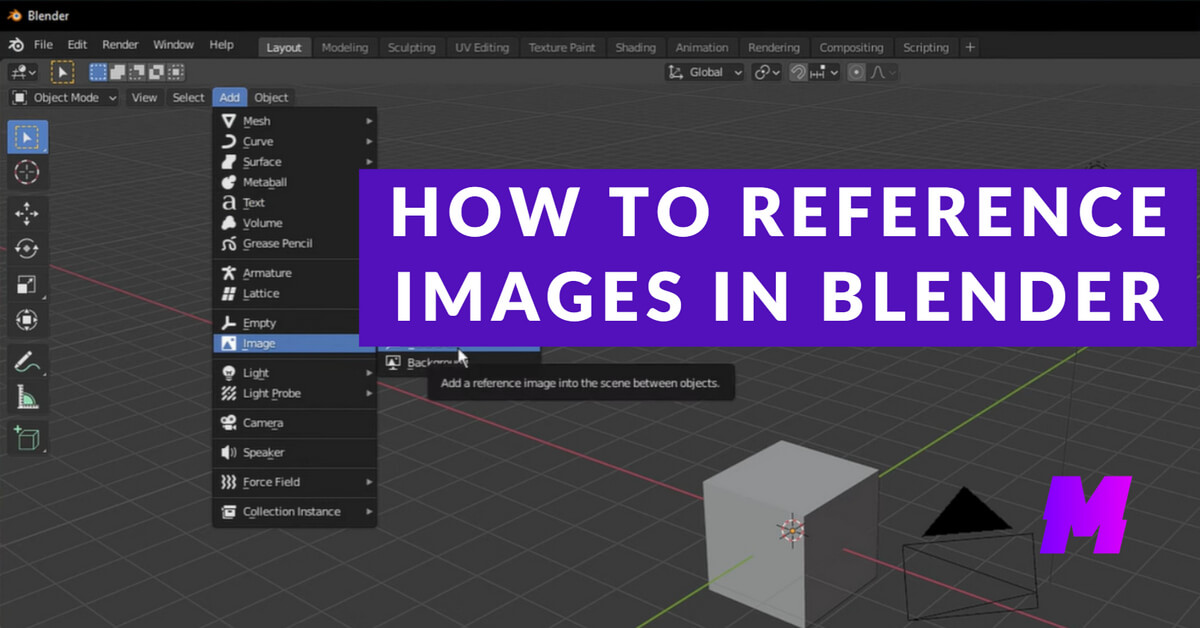
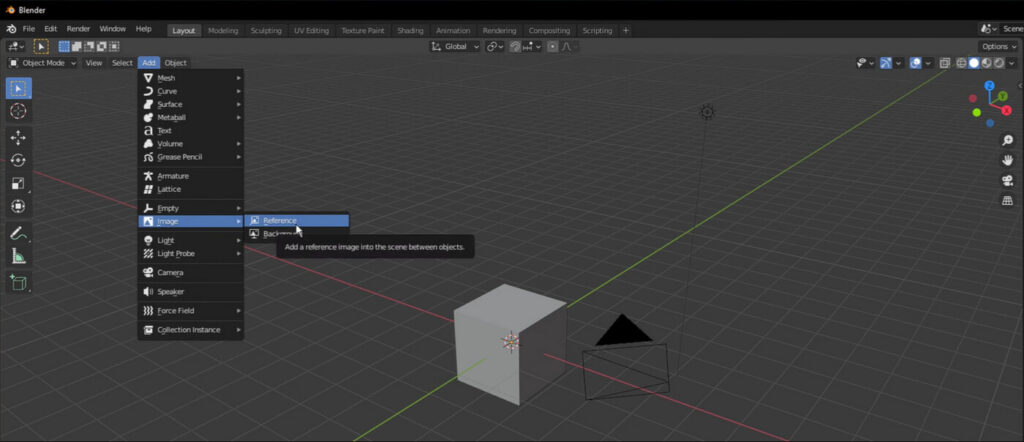
Adding a reference image in Blender is a useful technique for modeling, allowing you to use an image as a guide while you work. Here’s how to add a reference image in Blender (as of version 2.9x).
Note that reference images are for guidance and aren’t rendered in your final image or animation. They are there to assist in the modeling process by providing visual cues and scale.
👍Also Read:
- The 12 Best AI Graphic Design Tools for Creativity
- The 9 Best AI 3D Model Generators from Image or Text
Using Reference Images in Blender: Step by Step
- Open Blender and make sure you’re in the 3D Viewport.
- Add the Reference Image: There are two main ways to add a reference image:
- Using the ‘Add’ Menu:
- Press Shift + A to open the Add menu.
- Navigate to Image > Reference.
- Find the image file you want to use on your computer and select it.
- Click Load Reference Image to add it to your scene.
- Drag and Drop:
- Open the folder where your reference image is located.
- Simply click and drag the image file from the folder directly into the 3D Viewport of Blender.
- Using the ‘Add’ Menu:
- Position the Reference Image:
- Once the image is in your scene, you can move it by selecting it and using the G key (grab/move), and you can also use the R key to rotate and the S key to scale the image.
- You can also use the Transform panel in the 3D Viewport’s sidebar (press N if the sidebar is not visible) to enter precise values for location, rotation, and scale.
- Adjust the Reference Image Properties:
- With the reference image selected, go to the Object Data Properties panel (the green image icon in the Properties Editor).
- Here, you can adjust the opacity of the image, specify in which views the image should be visible (front, back, all views), and whether it should appear in front of or behind your geometry.
- Use the Reference Image for Modeling:
- You can now start modeling using the reference image as a guide. It’s often helpful to lock the image’s location and rotation to prevent accidental adjustments while you work. This can be done in the Object Properties panel under the “Transform” section by clicking the lock icons next to the location, rotation, and scale.
FAQs
Can I add a reference image using a shortcut?
Yes, you can press Shift + A to open the Add menu, then go to “Image” and select “Reference”.
How do I position and orient the reference image correctly?
Ensure your camera is oriented correctly (e.g., front view) before adding the reference image. You can use the numpad keys to set the view (e.g., 1 for front view). Once added, you can move (G key), scale (S key), and rotate (R key) the image as needed.
Can I adjust the transparency of the reference image?
Yes, you can adjust the transparency by selecting the image, going to the image properties, and modifying the “Opacity” setting.
Is it possible to use reference images in different views simultaneously?
Yes, you can duplicate the reference image and orient each copy to different views (e.g., front and side views). This can be done by rotating the duplicated image and loading a different image if needed.
What should I do if I can’t find the option to add a reference image?
Ensure you are in Object Mode, not Edit Mode. The option to add a reference image is available in Object Mode.
Can I lock the reference image to prevent accidental selection?
Yes, you can lock the reference image by selecting it, going to the image properties, and unchecking the selection box. This will prevent the image from being selected while you work.


![Read more about the article How to Install Stable Diffusion Using Easy Diffusion [Step by Step]](https://motricialy.com/wp-content/uploads/2023/07/easy-diffusion-768x402.jpg)
